In last blog, we understood about connecting MongoDB with our Node.js app. In this blog, we are going to expose our DB CRUD operation as REST APIs.
Please go through previous blog where we talk about having connection with MongoDB.
Before diving-in, let’s first talk about some common terminology:
REST API:
It is a web standard based architecture and depends on HTTP protocol. There are 5 most common used methods in REST API. These are:
- GET : Used for fetching data from source/database
- POST : Used to create data in source/database
- PUT : Used for updating/modifying the resources into the database
- PATCH : Mostly its behave as same as PUT though its implementation totally depends upon kind of work one wants to perform
- DELETE : Used for deleting data from database/source
In this tutorial, we are going to use some industrial good practices to create our app. We are going to use MV* architecture. If you don’t know what is MV* then you can read it from here.
So, before setting up our application we need to talk about our approach. We will use server.js as our application entry-point.
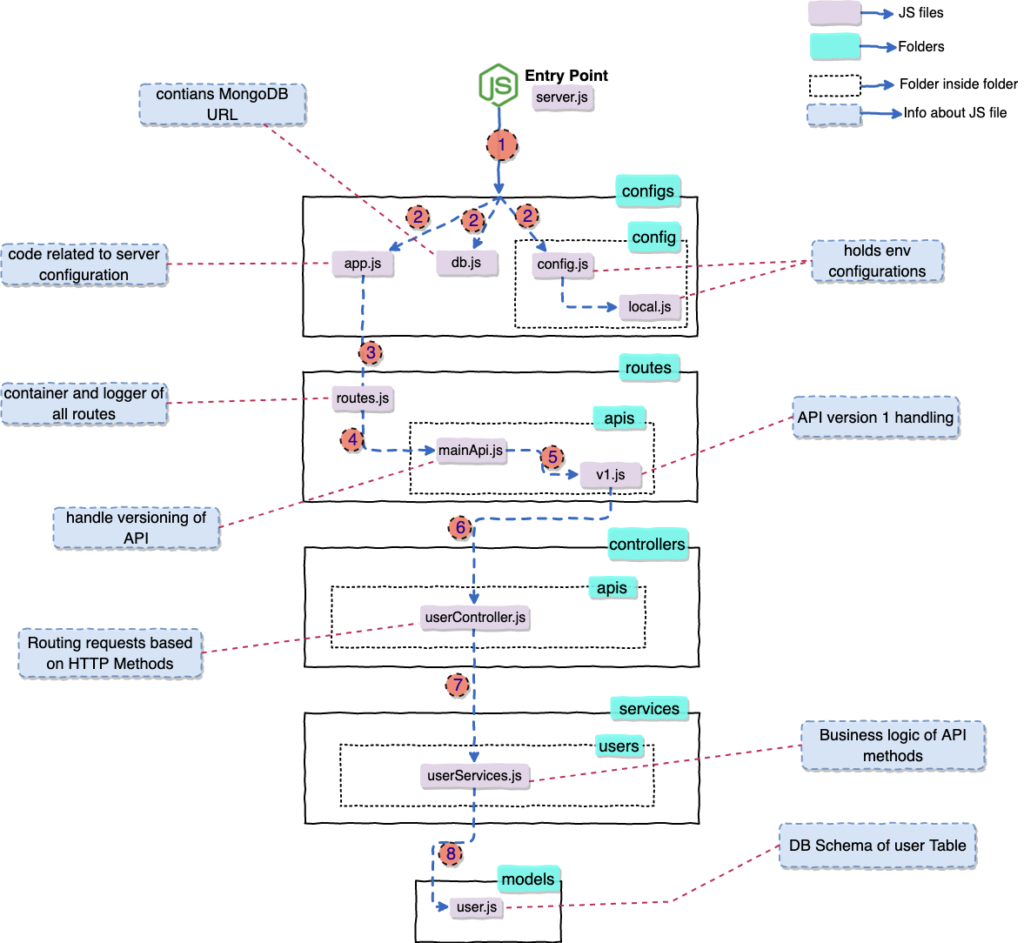
I’ve created one info-graphic for understanding our project structure. Though, it is self-explanatory but we will explain while we are creating our app as well.
So, now let’s start creating our application. Create folder REST_API and execute below command at root structure:
npm init
Note: make sure while creating the package.json file, you name your index file as server.js instead of default index.js
After creation of project folder, execute below command to install expres.js, mongoose, and other tools like babel babel-cli webpack which are required for our application:
npm install express mongoose body-parser --save

npm install babel-cli babel-loader babel-preset-es2015 nodemon webpack webpack-cli --save-dev
body-parser is used to parse all requests coming to application and babel is used for backward compatibility and webpack for production bundling.
So, From our high-level diagram, we will start from bottom to top. Let’s start creating our Model Schema for user. Create models folder in root directory, inside it create user.js and paste below code:
In above code, we are creating our user schema to hold up user information. In our schema, we are having only 2 required field for demo purpose. I suggest to read previous blog, where we talk about connecting MongoDB database with Node.js IFF you are still having understanding above code.
Once, we are done with our Schema model then we can move one step above in our diagram and we can create our Services structure.
Let’s create folder services in root directory. After that, create users folder inside it and create userServices.js inside users folder. In our userServices, we will write our core business logic for our APIs.
We will write logic for below functions:
- getUsers : Function to fetch all users from our MongoDB
- getUserById: Function to fetch single user information based on provided id from DB
- createUser : Function to create user in DB
- updateUser: Function to update user information into DB based on id
- deleteUser : Function to delete user based on id
In our code, we have used await and async features of es-next. These features provides us the power to perform operations asynchronously.
Paste below code in userServices.js. Right now, we will only code for createUser and getUsers api logic. Once done with these, we can mold others.
Understanding above code is easy as we have written similar kind of code in previous blog while working with MongoDB connection with Node.js app.
Now, we can move on for creating controller section. This will help us to control the redirection/routing of request depending upon HTTP methods (GET, POST etc).
Create controllers folder in root directory of project and create apis folder inside it. Inside this, create userController.js file which will hold our controlling logic.
In userController.js, we are creating object of router() function from express.js framework. Using router we can redirect HTTP methods to their desired function in userServices.js. For understanding more on router function, please visit this. Paste below code in your userController.js file:
Let’s move to one more block up. There we will find that we are having routes logic folder. Here, we will hold our API versioning and logging.
So, first create a folder routes in root structure and create a folder apis inside it. Inside this, we will create mainApi.js and v1.js files.
v1.js will hold version 1 of our API. In this again we are creating route object and calling controller object with help of route object. Below is the code of v1.js file:
Next is mainApi.js file. This will help us to handle versioning and we can redirect request to different versions based on logic. In this file, we are going to call v1.js with help of router object. Below is the code of mainApi.js:
Now, we can move to routes folder. Create routes.js inside routes folder. This file will act as a logger and upper layer router. Below is the code of this file:
So, most of our 90% app is complete. We are just left with few stuffs. Let’s do them quickly and try to run our app.
Let’s create configs folder in root structure. Inside it, create config folder. Inside config folder, create 2 files config.js and local.js. these files will help us to hold environment configurations. Below is code for local.js to hold port information where our app will run
In config.js, we will hold local configuration as well as environment configurations. Though, if you want you can merge these 2 files and work with one file only.
Now, inside configs folder, create 2 files app.js and db.js.
db.js contains MongoDB information. Just paste below code:
app.js contain code related to server configuration. In this, we will write start and create function. create will configure all setup of our application and start will start our application. Paste below code:
Yayyy!!!!, we are done. Now, we just need to code our Entry point server.js. Just paste below code:
And we are done. We have completed our application. Just run the app using nodemon server.js and open Advance Rest Client or any other Rest client.
Note: While creating our app, we encounter that we are creating
routerobject withusemethod handlers. These handlers are API urls.
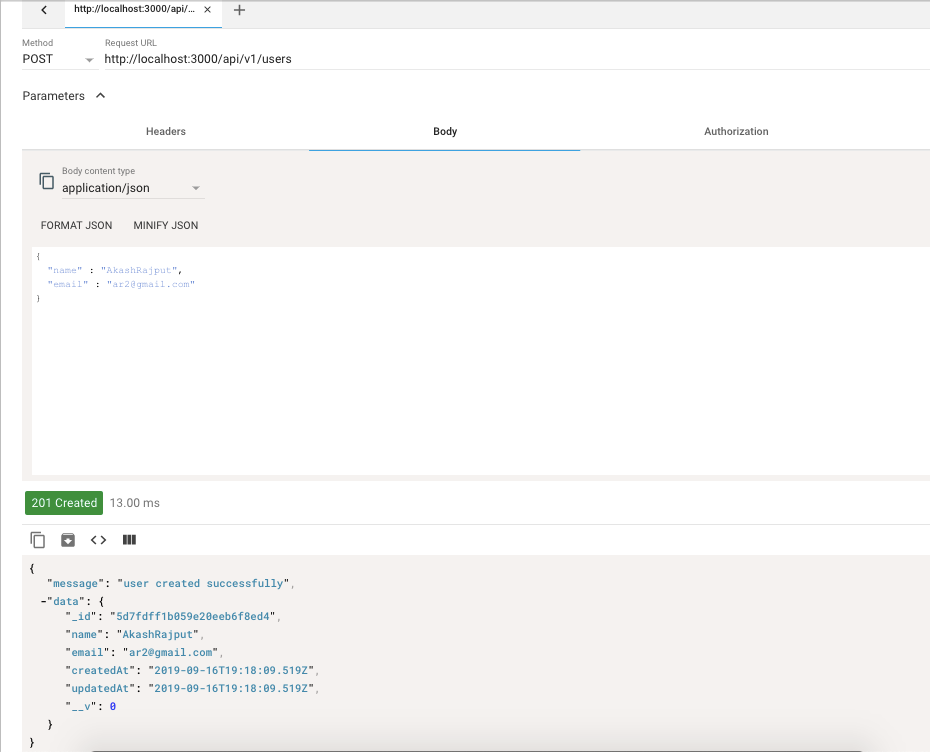
So, open your rest client and hit below api
Creating User
POST http://localhost:3000/api/v1/users
You should get below output:
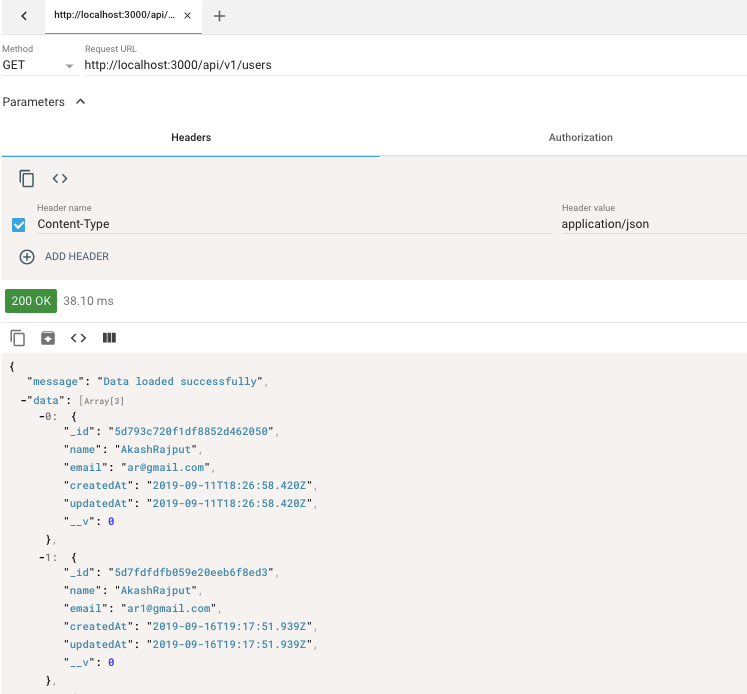
Get users
GET http://localhost:3000/api/v1/users
You should get something like below:
In same way, one can create other functions like getUserById, updateUser and deleteUser. You should try creating these by yourself. If you still want to get full project code, I’ve uploaded in on my GitHub. You can fork or clone it from here.
In next series, we will learn how to make this API secure.
Until Next……